
Design and installation guide - custom tanks
This page has been designed to assist with tank design, accessories, and other installation considerations.
The first step
To take into account the place where the tank will be located, the connection tubes to and from the tank, the height of the connections, how to empty it, how to measure the levels, dimensions, shape, etc. You can make a model of the tank in cardboard and tape if you want to see the dimensions and shape more clearly. Once the model is made, it is easier to know where the accessories will go and calculate how the model will have to be reduced for the connections.
This guide has a lot of information for wastewater tanks, sanitary system installation, and system components in total because there are more considerations with this type of tank. The most important thing will always be to make sure and be careful that the new tank enters the boat, (access through doors etc.)!!
Also, there is a notice to clarify the work offered by the business and the work not offered by the business to avoid misunderstandings (See Priorities below)
Our Priorities (Applicable to everyone):
Priority 1. Manufacture of custom tanks only for clients who have paid the deposit and are in the planning, also in the case of repairs in the workshop we work according to the planning.
Priority 2. We make estimates for clients who send us detailed specifications of the tank, only then can we provide definitive estimates.
Priority 3. If the specifications are not detailed, only an approximate budget can be made. The final order cannot be made with just the approximate budget but we will need all specifications before we can accept the final order.
Priority 4. If necessary and depending on availability, we can take measurements in the port of Port Ginesta or Garraf to make an approximate budget. The deposit must be accessible. It will be the client's responsibility if any element has to be dismantled to access the measurement.
Priority 5. In some cases, if necessary, we can also take measurements in other ports to make an approximate budget (we charge for travel). The deposit must be accessible. It will be the client's responsibility if any element has to be dismantled to access the measurement.
To get a no-obligation quote, simply send us a drawing with the measurements and details of the connections, if possible, in some cases it also helps if they bring or send us the old tank or a model.
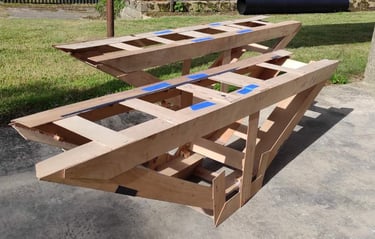
"I have space for a new deposit".....We advise you to make a model / mockup from thin walled ply/cardboard and tape or take measurements if there is no doubt and consider the new installation, there are many tips in this guide
"I have an old tank".....we advise you to empty and remove the tank to ensure the measurements and shape and all connections, then consider the new installation to identify changes that may be required. There are many tips in this guide
Drinking water tanks are not difficult. No need for large aeration. 13mm or 16mm is usual. A access hatch recommended
Diesel Fuel
Don't forget to indicate the return connection, specify the tubes inside and if the supply connection is at the top of the tank. A access hatchis very useful in case there are bacteria inside the tank one day.
Dirty Water, Grey Water
How to avoid problems with Black water/dirty water tanks
We can advise on ISO8099 standards as we manufacture tanks to ISO8099.
There is always the temptation to install a smaller and cheaper tank just to comply with the minimum of the law, however, once installed and in use and if you are anchored in a cove it is not the best time to discover that your tank should be 4 times larger.
Some problems with inadequate Black water holding/sewage systems;
Bad odors - the cause is that other tanks have too thin walls (standard tanks), inferior sanitary hose (not double layer), insufficient aeration size.
Insufficient capacity - a tank that is too small
Tank explosion or implosion - blocked aeration (See more on Aeration size at low)
How can the tank explode?
1) If the tank has a blocked vent
2) Continued use of the toilet
3) The tank receives a break when emptying, the tank receives air through the valve in the toilet "Joker valve" (but the aeration hose is already blocked)
4) Tank gets more pressure when you are filling next time = Explosion.
5) Or you can have an implosion when the tank is being emptied with pump extraction in the marina, due to very strong suction of the machines, the vent hose is blocked, the "Joker" valve in the toilet cannot give enough air or as fast (We do offer a Tanksaver option)
Leakages / leaks - thin tanks, flexible tanks, bottom fittings, bottom hose, low cost access hatches
Gravity emptying system - results in outlets blocked with toilet paper, it is not possible to empty the tank
Aluminum and stainless steel tanks are not best suited for black water tank use because urine is very corrosive. Polyethylene is an ideal material for dirty water tanks as it is an anti-corrosive material against dirty water liquids.
Many boats have installed flexible tanks in any opening, with no fixing in place and causing many problems. With these types of tanks it is almost impossible to install hoses and fittings correctly. Some do not have venting which eventually causes the fittings to explode due to pressure.
Do not put any type of material through the system that is not designed for toilets, you must use thin and cheap rolls of paper, nothing else, above all, never women's sanitary products, wipes, or dishwashers or cleaning materials that have oil in them. pines, alcohol or oil. These will break gaskets and valves in the system and even the hose walls and can be the cause of odors due to the degradation of the hose walls.
"Boatwide" brand rigid tanks have walls of sufficient thickness to prevent odors. The thickness of the walls has to increase with the size of the tank, otherwise the walls will be too weak to contain dirty water. In some cases there are plastic tanks available through catalogs that have walls as thin as 3mm and that is not enough. (All BoatWide tanks have 10mm thick walls and even 12mm thick for high capacity tanks)
Aeration – Diameter and Location Considerations
We test all tanks with pressure 1.5 times higher than the ISO 8099 standard. A pressure of 3 tons per square meter. It is an example of the level of our confidence in the products we make.
The diameter of the aeration is very important and 20mm is considered sufficient. The ISO8099 document, (the CE specification for blackwater system installations), indicates using this diameter but according to our experience we recommend a minimum of 25mm for safety as the result is better.
1) The extraction pump equipment which is normally available in the marinas/ports is very strong and obstructions in the vent or insufficient diameter can cause total implosion of the tank, which will cause all the contents to go to the bilge.
2) Overfilling may cause contents to rise up the small vent, causing blockage of the breather. Toilet paper under pressure can be major cause of blockages. The result – very dirty and hard to clean and the possibility that you need a new anti-odor filter.
3) Overfilled and tank has excessive pressure resulting in tank explosion. It turns out – the contents in the bilge
4) If there is a toilet with an electric pump, the process is strong and the contents are in the tank faster than the air can escape resulting in excessive pressure and explosion of the tank, especially if the aeration is blocked. It turns out – the contents in the bilge
5) With sailboats the tilt of the boat can cause the contents of the tank to be in the breather tube and if someone is using the toilet pump then follow points 2 and 3
The solution - a vent that is as large as possible. We recommend the same diameter as the inlet and outlet. The advantage is that the respirator can give air to the tank when filling or emptying and flushing with an electric pump or extracting with the port pump. With a larger respirator you will not have obstructions if the tank is overfilled or it is a sailboat sailing,
Unfortunately on many boats there is not much space, it is already very difficult to pass the inlet and outlet tubes through the boat and passing a 38mm aeration tube is too much for the installation.
SOLUTION - If it is difficult to install 38mm hose throughout the entire boat, consider the 38mm option for an available distance (up to a wall or curve) and then put a reducer to 25mm. Therefore, we can supply 38/25mm Adapters for the aeration system. A 38mm hose for a distance close to the tank can give "more capacity to the aeration system." Relieves the back and forth flow of some solids without blocking the aeration system.
Resumen
Vent 16mm - Insufficient. You're going to have problems
Vent 20mm - Insufficient. It could have problems
Vent 25mm – Acceptable. Note: We do not accept orders for tanks with vent connections less than 1" (25mm).
38mm for one meter or two meters and reduce to 25mm – More acceptable.
38mm per boat entire aeration system which includes a 38mm filter. Better option
The tank vent and level sensor
The aeration location in the center of the tank is always better for motor boats or sailboats because the boat is not exactly horizontal. Of course sailboats move more to port or starboard and motors more stern/bow. In both cases there is less chance that the contents will rise due to the aeration if it is located in the center of the tank even if the tank is not located in the center of the boat.
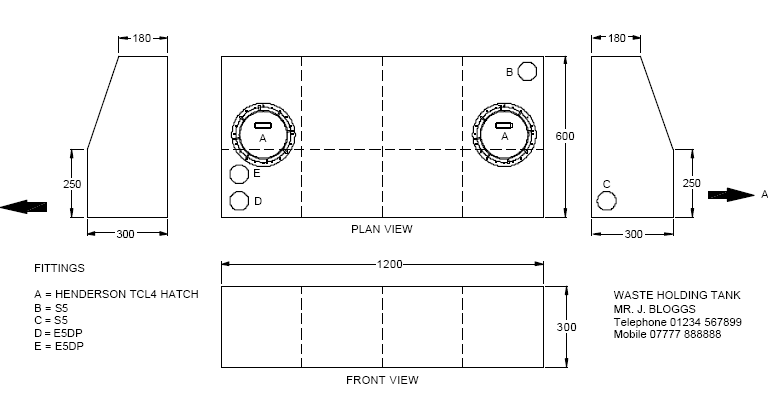
Also, in the design of the tank, the location of the gauge/electric switch must be considered. For example the below drawing shows a sailboat which has a holding tank in the shape of the hull, the tank's location is on one side of the boat.
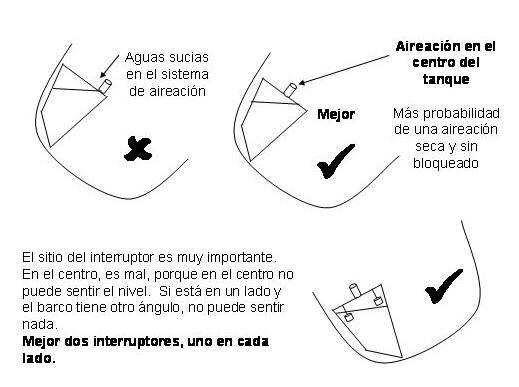
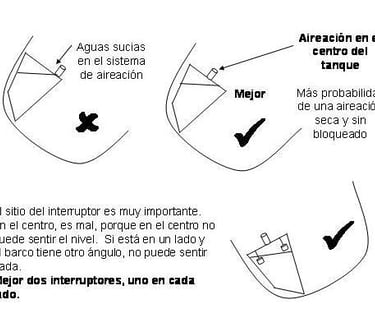
The best design to prevent overloading the tank and suffering the consequences of blocked aeration and tank explosion.
More recommendations
The tank breather tube must be as straight as possible, without low points.
The installation of an anti-odor filter between the tank and thru-hull to reduce odors.
The thru-hull is not the same as the fuel type, it would be the type that is completely open.
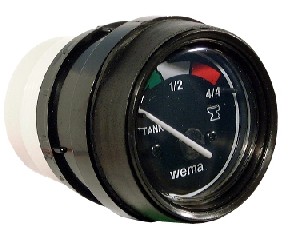
Install a gauge and indicator light and ensure that the light is visible to everyone. If it is not visible the tank will be full and the contents can only rise through the snorkel.
Tanksaver. To avoid implosion. When the tank is emptied with pump extraction from the port, the tank feels a very strong suction. If the aeration hose is blocked, the "Joker" valve in the toilet cannot give enough air or as fast. To prevent there is a product "Tanksaver", it can save the tank from implosion.
During the design of the tank we can manufacture the tank with an extra connection by extraction through the cover plug. It is not necessary to connect it immediately, we can put a cap on the tank and it can be connected in the future when there is a need. The diameter for this connection is 38mm.
General tank specification/installation
All tanks need at least one inlet, one outlet for the tank contents and aeration connection. It is useful to put a gauge with an level sensor to see the level inside the tank.
The tank needs a sufficient base to support the tank and the contents
Fix or tie the tank well in its final location but be careful that the materials used do not cause damage.
Ensure that there is enough space around the tank and there are no sharp objects nearby.
Keep away from fire or direct heat, heating, heating exhaust hoses, diesel, etc.
Do not overtighten the fittings or nuts on access hatches.
Read the instructions for indicators and level sensors
Ensure that the gaskets are in place of the fittings, or have Teflon tape
With fittings and hoses, ensure that both are smooth and soften the hoses with hot water before inserting the hose into the fitting.
Ensure that the tank is supported well below and secured well.
Be careful with the orientation of the hoses and connections so there are no bends that could cause blockages in the hose or problems with the connections in the tank. Avoid places where the hose can be lowered and retain the contents in those places. Avoid excessive bends that can cause an obstruction or strain connections. Support thick hoses.
Avoid siphoning when inlet and outlet hoses end below sea level (inside or outside the boat). The hoses need to curve upward to eventually terminate above sea level.
Only use the best quality sanitary hose available, such as double-layer ones. Use double stainless steel clamps.
All pipes must be 38mm (1 1/2") (except for the outlet for a macerator which must be 25mm)
Connections
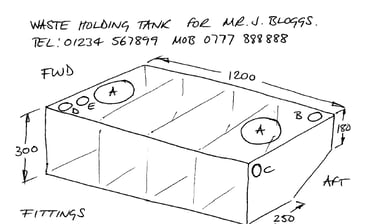
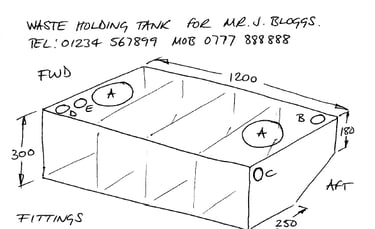
First, you have to decide the site, and then the size of the connections. It is very important to know if there is enough space for the tank and all the accessories you need. Maybe you have to modify and reduce the size of the tank for accessories. At the end of this document, there is a typical drawing of a tank with accessories. Make a very clear drawing with all the information that is necessary.
Each accessory has a high value that will affect the design of the tank and the final dimensions with the space that is available. Be careful with the dimensions of everything, it is normally not possible to modify the tank.
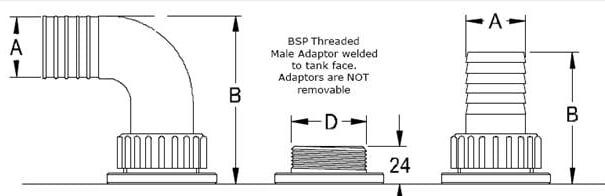
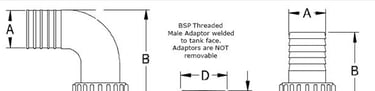
There are 3 types of connections:
1. Thru-hull, nylon, white, are mounted from inside the tank during manufacturing or through a access hatch, thru-hull tightened with thread outside the tank, available in various sizes
2. Black polyethylene tube, can be straight or elbow (Please indicate the orientation of the elbows because they are permanently mounted on the tank).
3. Fittings/Connections, nylon, white (curved and straight) are mounted by sleeves cast with the tank. They have "BSP" (Gas) Female or Male thread. The male sleeves can be seen below. The female ones are approx. 8mm and have a 20mm thread that goes inside the tank.
If you want an extraction tube, please indicate it in the drawing. Drinking water, gray water, black water and diesel tanks may have an extraction tube to extract the contents of the tank.
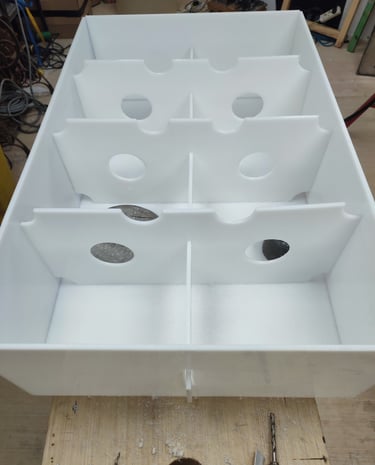
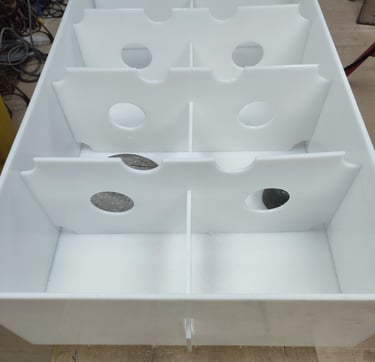
Baffles
It is very important that in the design of the tank, the accessories avoid the internal baffles. A custom tank can have fittings anywhere but they have to avoid breakwater sites. Every reservoir will have baffles unless it is very small.
The baffles are located every 300mm to 400mm, depending on the length of the tank. For example, a 1200mm long tank will have 2 baffles with 3 compartments 400mm wide. A tank 675mm long will have 1 baffle with 2 compartments 337.5mm wide. If the required location of the access hatch causes an interference with the baffle, the baffle will be shaped in such a way that the access hatch fits without interference
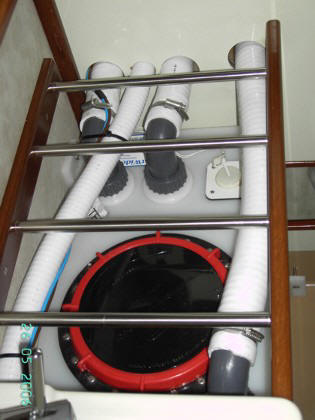
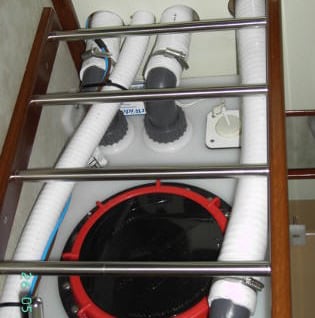
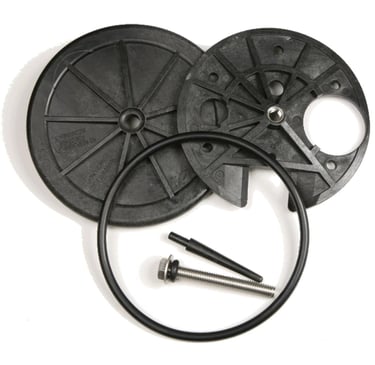
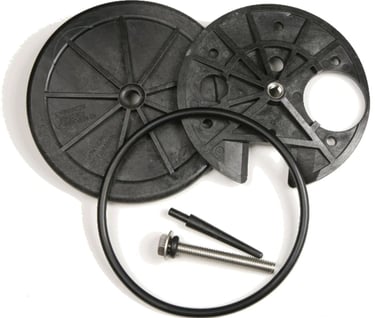
Tank Access Hatch
Standard black cover. It has a nut and a gasket and is the smallest and perfect for any tank. Diameter 150mm. Withstands 30kpa pressure test well.
Level - Gauges and indicators
With any type of tank, it is important to know the level of the contents.
We have internal sensors and external sensors. You don't have to drill a hole in the tank.
With dirty water tanks, the indicator light needs to be installed in the toilet so it is obvious when the tank is full. If the tank is more than full, then the contents will go down the sanitary hose into the aeration system, with the possibility of more serious problems.

The tank drawing
Make a computer drawing and attach with email to info@boatwide.es. If it is a paper drawing, scan or take a photo of the drawing and attach with email. We make estimates as soon as possible (sometimes between 2-3 hours), however, sometimes when we have a lot of work it can be 2-3 days.
It is important to have as much information as possible to make a budget. We need all the dimensions and locations of accessories etc. With many angles please mark square angles (90°). You can make a tank template with cardboard and tape or wood or if you prefer on a drawing (but a drawing is all we need to make an estimate).
Note: Make sure the tank can pass through the boat/van doors
Computer design in Sketchup (Select save in version 8 or 13), Excel, Word, Powerpoint, photo of the drawing made by pen and paper.

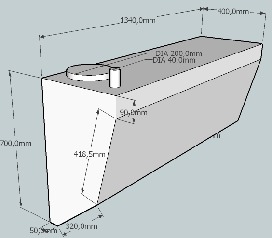

Drawing created with AutoCad
Hand drawn drawing
Drawing created with Sketchup
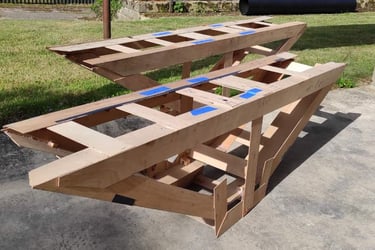
Templates/Patterns
Some people prefer to send us a template of the required tank. The benefit of making a jig is that you can ensure that it fits into the available space without problems and also that it can fit through doors or boat/vehicle openings.
CONTACT
info@boatwide.es
TEL: 0034 666096077
0034 626246131